Whether you are drying calendula for making oil, salve, cream, or for making tea – I suggest using a dehydrator. The caps on the underside of the blossoms take a long time to fully dry, and can easily mold – especially if your environment is humid or rainy. Be sure to dry and utilize these flower bases, not just the petals. The base contains the most nutrients and medicinal properties!
No dehydrator? You can air dry IF you live in an arid location. Read on to learn all about drying calendula using these two methods.
You’ll notice that I suggest harvesting and drying both the blossoms and the leaves. The leaves contain iodine and other properties. These properties add to the medicinal value when making oils, salves, creams, and teas. Don’t worry, calendula plants are very prolific and will continue to produce sunshiny flowers each day even if you harvest part of the stem/leaves in addition to the blossoms.
Method Overview
- Pick the flowers with stems and leaves late morning on the day they bloom; partially opened flowers can also be harvested
- Wash and lay them on a towel
- Either arrange on dehydrator shelves or hang to dry
FAQs and Definitions
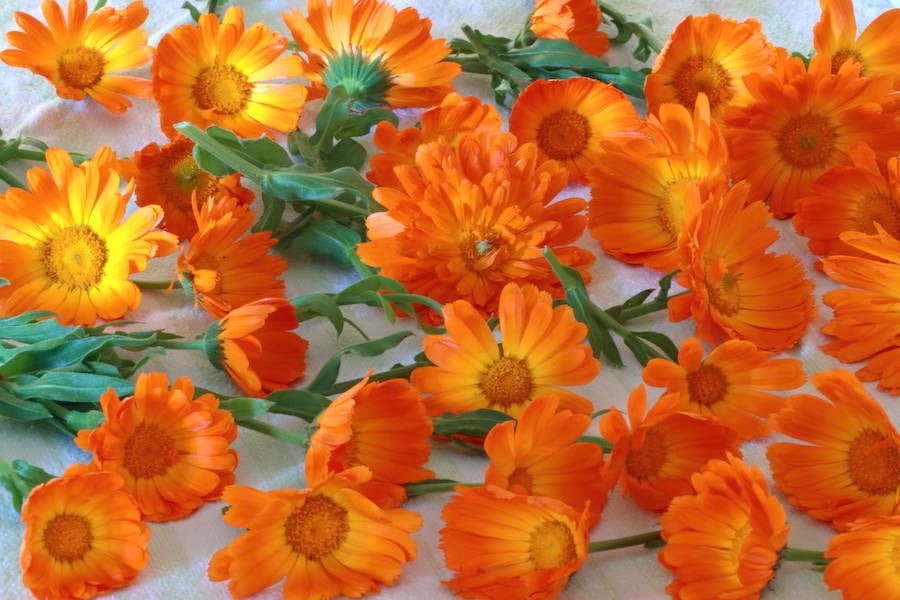
Washing calendula before drying it may seem counterintuitive; however, both the blossoms and leaves may contain dirt, grass clippings, and other debris. If you feel like your calendula harvest is already clean, then skip this step.
Put the blossoms still attached to their stems and leaves into a large bowl filled with clean cold water. Swish, let the dirt settle, lift up the calendula, and empty the water. Repeat this step at least one more time or until the water runs clean.
Lay the washed calendula single layer on a towel to dry. Cover with a second towel and gently blot.
Garbling is the process of removing the leaves and flowers from the stems. The first time I learned this word I giggled – it’s such a fun word 🙂
Once dried, the leaves can be easily garbled by running your fingers down each stem. Do this over a bowl or jar so you can catch the leaves as they are released. You will not be using the stems; they can be added to your compost pile.
Conditioning is a term that refers to the process of equalizing moisture from dehydrated herbs, fruits, or vegetables – thus preventing mold growth.
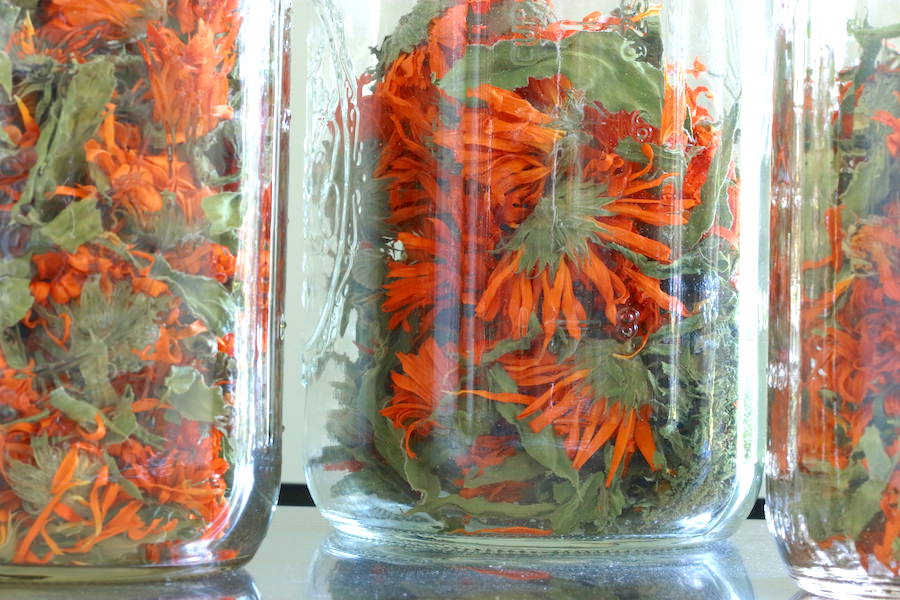
After the blossoms and leaves have been dried (and cooled) completely, pack them loosely in glass jars with tight fitting lids. If any of the calendula still contains a bit of moisture, this little bit of moisture will become absorbed by the drier pieces as long as most of the herb has been thoroughly dried. During this conditioning process, store the jars out of the sun, but somewhere in sight, so you remember to look at them often. Shake the jars daily to separate the pieces and also to check for moisture and mold. If condensation develops in a jar, remove all of the calendula and recommence drying. After you have conditioned in this way for 7 to 10 days, store the jarred calendula in a cool, dry, dark location. At this point you can pack the jars more tightly.

If you are in the market for a dehydrator, I suggest looking into the Excalibur models. I love my 9 tray unit with a timer, fan, and thermostat. They even offer optional stainless steel shelves.
Drying Calendula in a Dehydrator
Equipment
- dehydrator
Ingredients
- Calendula blossoms with stems and leaves
Instructions
- Put the blossoms still attached to their stems and leaves into a large bowl filled with clean cold water. Swish, let the dirt settle, lift up the calendula, and empty the water. Repeat this step at least one more time or until the water runs clean.
- Place the calendula on a towel to dry. Cover with a second towel and gently blot.
- Cut off the blossoms near the base and arrange them single layer on your dehydrator's shelves. Leave a bit of space in between each blossom.Arrange the stems/leaves single layer on separate shelves.
- Turn your dehydrator on. If there is a thermostat, set it to 125ºF.Please note that other websites suggest setting the thermostat to 95ºF; however, I find that it takes approximately 24 hours for the base of the blossoms to completely dry at that temperature. At 125ºF, the blossoms will dry in 8 to 10 hours, and the petals do not become "cooked."
- Rotate the trays periodically from top to bottom. When rotating, also turn the trays around since the back of the dehydrator may be hotter than the front.If your dehydrator doesn't have a thermostat or circulating fan, you will have to be vigilant and rotate the trays more often.
- The leaves will dry before the blossoms. Once the leaves are brittle, remove their trays from the dehydrator and let them cool down completely.Once cooled, garble the leaves from the stems and put them into tightly capped glass jars such as mason jars (you will not be using the stems; they can be added to your compost pile).
- It may take several more hours for the blossoms to completely dry. The petals will be dried before the base on the underside. Be patient and wait until the entire blossom is dry. When ready, remove the trays and allow the blossoms to cool down completely before putting them into the jars with the dried leaves. Store out of direct sunlight while the herb conditions.
- Shake the jars daily to separate the pieces and also to check for moisture and mold. If condensation develops in a jar, return the calendula to the dehydrator.
- After you have conditioned in this way for 7 to 10 days, you can pack the jars more tightly; store them in a cool, dry, dark location.
Drying Calendula by Hanging on a Line
Equipment
- line for drying
Ingredients
- Calendula blossoms and stems with leaves
Instructions
- Put the blossoms still attached to their stems and leaves into a large bowl filled with clean cold water. Swish, let the dirt settle, lift up the calendula, and empty the water. Repeat this step at least one more time or until the water runs clean.
- Place the calendula on a towel to dry. Cover with a second towel and gently blot.
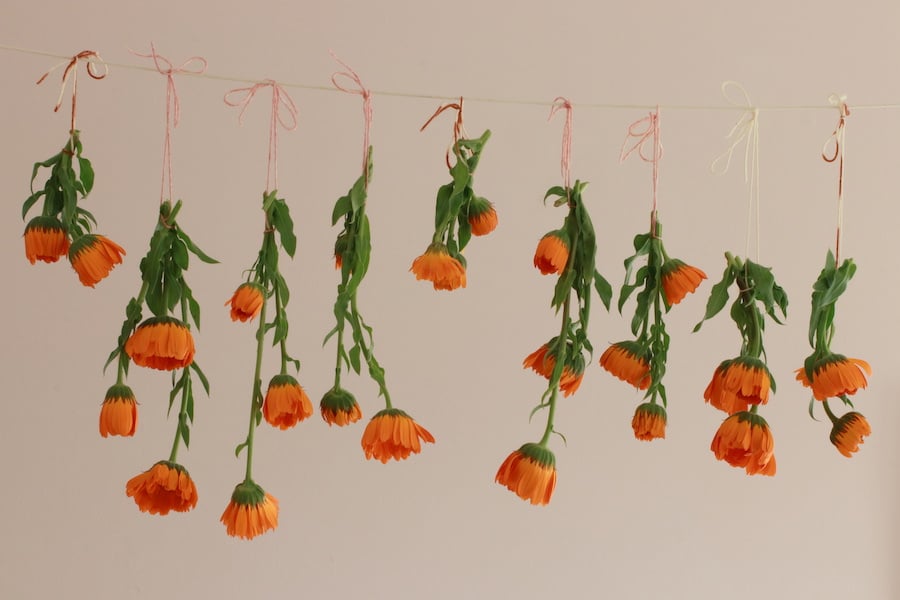
- Hang from a line in small bundles, not tightly packed large bundles, to encourage air flow. It will take several days for the blossoms to completely dry. The base on the underside will take the longest.
- Once fully dry, cut the blossoms from the stems and garble the leaves (you will not be using the stems; they can be added to your compost pile). Loosely pack the flowers and leaves in jars with tight fitting lids and store out of direct sunlight while the herb conditions.
- Shake the jars daily to separate the pieces and also to check for moisture and mold. If condensation develops in a jar, remove all of the calendula and recommence air drying in a well ventilated location such as on a screen or drying rack.
- After you have conditioned in this way for 7 to 10 days, you can pack the jars more tightly; store them in a cool, dry, dark location.
Notes
Benefits of Calendula
Externally
- supports rapid wound healing
- reduces inflammation
- reduces scar formation
- prevents bacterial infections
- helps heal sunburn
Internally Supports
- lymphatic system
- channels of elimination
- liver
- gall bladder
- gastrointestinal tract
- may reduce inflammation of glands and GI
If you enjoy this post on drying calendula using two methods, you may also enjoy Medicinal Herb Garden, Dehydrating Apples – Easy Method and Dehydrating Grape and Cherry Tomatoes.
Can I dry calendula on a line in my dry garage? The garage has no lighting or heating and is seperate to our house.
Hummmm, well is your garage sparkling clean with good ventilation – or is it a typical garage with dirt/dust and smell like cars and oil and such?
Do you live in an arid or humid climate? As I’ve said, I find that line drying isn’t the best for a humid climate because the caps of the flowers contain a lot of moisture and may mold if hung.
These are the questions that come to mind.
I dry mine in a spare room of the house. I lay them out on a layer of paper towels that line the short cardboard boxes you get from Costco. it takes about a month to fully dry, sometimes 2 months. it all honestly depends on how much moisture is in the air at that particular time. if your not sure it’s better to over dry. hope this helps.
Can you hang and dry the flowers in the attic?
Possibly. Is your attic dry with good air circulation? Would the herbs be out of the sun? Is it dusty? Is there insulation exposed up there? There are some of the questions that come to mind.
when making tea, will the flower base separate from the petals in the shaking up process and does the base need to be chopped up at all after it is dry? love this article and can’t wait to get drying!
Hi Mama! In my experience the petals don’t separate from the caps that easily. Besides, you don’t need to shake the jars that hard, just move them around enough to be sure the dried flowers aren’t sticking together from moisture. If that happens, you need to dry them some more.
You can rip or cut the caps right before using to extract the most medicine from them. Cutting them with scissors works good for this purpose. Have fun 🙂